A tooltip control is a small popup window that, as its name suggests, allows you to provide explanatory text (i.e., a tip) about your applicationÆs tools. Tooltips are supported in C++Builder via the THintWindow class. In a VCL application, the TApplication object creates and maintains a THintWindow object, which it uses for all controls whose ShowHint property is true.
In this article IÆll show you how to create and use a THintWindow object to display your own tooltips (as shown in Figure A). IÆll also explain how to create a THintWindow descendant class, and how to use this class to replace the default tooltips that are used by your application.
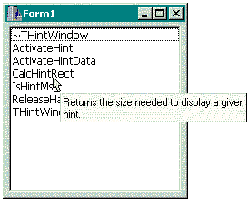
Figure A: A list box with per-item tooltips.
The THintWindow class is a direct descendant of the TCustomControl class. TCustomControl is simply an extended TWinControl that provides a Canvas property and an associated Paint() method. Because the THintWindow class descends from the TWinControl class, all THintWindow objects contain an underlying window handle. This is actually an important requirement because tooltips can appear beyond the bounds of a specific form. For example, in Figure A you can see that the tooltipÆs right edge indeed exceeds the formÆs right edge. As I mentioned last month, there are actually two ways to accomplish this effect. One way is to use a combination of the WS_CHILD and WS_EX_TOOLWINDOW styles and then make the popup window a child of the desktop window. The other methodŚwhich is useful only when the popup window doesnÆt have to capture the mouseŚis to use a combination of the WS_POPUP and WS_EX_TOOLWINDOW styles. The THintWindow class takes this latter approach, which you can see from the following C++ translation of the THintWindow::CreateParams() method:
void __fastcall THintWindow::
  CreateParams(TCreateParams& Prms)
{
  TCustomControl::CreateParams(Prms);

  Prms.Style = WS_POPUP | WS_BORDER;
  Prms.WindowClass.style |= CS_SAVEBITS;
  if (NewStyleControls)
    Prms.ExStyle = WS_EX_TOOLWINDOW;
  // ...
}What might not be obvious from looking at Figure A is that the form doesnÆt lose activation when the tooltip is displayed. This is accomplished by specifying the SWP_NOACTIVATE flag in the call to the SetWindowPos() API function, which the THintWindow class makes from within its ActivateHint() method. As you might have guessed, the ActivateHint() method is used to display a tooltip. HereÆs the declaration of ActivateHint():
virtual void __fastcall ActivateHint(
  const TRect &Rect,
  const AnsiString AHint);
The Rect parameter specifies where you want the tooltip to appear (relative to the screenÆs top-left corner), and its size. The AHint parameter specifies the caption that the tooltip should display.
As it turns out, the ActivateHint() method is rarely used alone. In most cases, a call to ActivateHint() is preceded by a call to the THintWindow::CalcHintRect() method. This latter method is used to calculate the width and the height of the tooltip for a given font and caption. In other words, CalcHintRect() is used to determine the width and the height of the rectangle thatÆs passed as ActivateHint()Æs Rect parameter. Here is that declaration:
virtual TRect __fastcall CalcHintRect(
  int MaxWidth, const AnsiString AHint,
  void* AData);
The MaxWidth parameter specifies the width (in logical units) beyond which the tooltipÆs caption is wrapped to the next line. The caption is specified by the AHint parameter. If you want to pass user-defined data to the THintWindow object, you can use the AData parameter.
Within a VCL application, the TApplication object calls the CalcHintRect() and ActivateHint() methods from within its own ActivateHint() methodŚi.e., from within the TApplication::ActivateHint() method. I wonÆt discuss this latter method because itÆs not accessible in all versions of C++Builder.
As with any window, there are several ways to hide a tooltip. Unfortunately, because the ActivateHint() method doesnÆt update the tooltipÆs Visible property, the Hide() method wonÆt work. Instead, you can use the THintWindow::ReleaseHandle() method, which will hide the tooltip by destroying its underlying window. A more efficient approach, however, is to simply call the ShowWindow() API function, specifying the SW_HIDE flag. This will hide the tooltip without actually destroying its window. In fact, the TApplication class takes this latter approach from within its HideHint() method.
Unlike the TApplication::ActivateHint() method, the HideHint() method is accessible in all versions of C++Builder. Unfortunately, HideHint() isnÆt useful for hiding custom tooltips unless youÆve previously called the TApplication::ActivateHint() method to display the tooltip.
In this section IÆll provide an example of using the THintWindow class by implementing a per-item tooltip for a list box as depicted in Figure A. The header for this example is provided in Listing A.
Notice from Listing A that there are four private members in the TForm1 class: last_index_, tic_, HintWindow_, and HintList_. IÆll explain the last_index_ member shortly. The tic_ member is used with a TTimer object (Timer1), which allows the hint window to be hidden after a specified delay. The HintWindow_ member is the THintWindow object, and HintList_ is simply a TStrings object that will hold the list of tips (one for each item in the list box). The members are initialized in the formÆs constructor like so:
__fastcall TForm1::TForm1(
  TComponent* Owner) : TForm(Owner),
  last_index_(-1), tic_(0),
  HintList_(new TStringList())
{
  HintWindow_ = new THintWindow(this);
  HintWindow_->Brush->Color = clInfoBk;

  HintList_->Add( /* ~THintWindow */
    "Frees the memory associated with "
    "the THintWindow object.");
  HintList_->Add( /* ActivateHint */
    "Displays the hint window.");
  HintList_->Add( /* ActivateHintData */
    "Displays the hint window using a "
    "provided data value.");
  HintList_->Add( /* CalcHintRect */
    "Returns the size needed to display"
    " a given hint.");
  HintList_->Add( /* IsHintMsg */
    "Determines whether an application "
    "message requires hiding the hint "
    "window.");
  HintList_->Add( /* ReleaseHandle */
    "Destroys the window displayed by "
    "THintWindow.");
  HintList_->Add( /* THintWindow */
    "Creates and initializes an "
    "instance of THintWindow.");
}
Note that although I manually typed in the text for each tip in this example, youÆll likely want to use a more maintainable approach in practice. For example, you could load the tips from a separate text file, a string table resource, or even a database table.
Next IÆll implement a few methods to show and hide the tooltips. Remember, to display a tooltip, you use the THintWindow::ActivateHint() method. This method is called from within the TForm1::DoActivateHint() method:
void __fastcall TForm1::DoActivateHint(
const TPoint& P, AnsiString TipText)
{
// compute the tooltipÆs rect
const int max_width = 200;
TRect HintRect =
HintWindow_->CalcHintRect(
max_width, TipText, NULL
);
// position the tooltipÆs rect
OffsetRect(
static_cast<PRECT>(&HintRect),
P.x + 10, P.y + 10
);
// display the tooltip
HintWindow_->ActivateHint(
HintRect, TipText
);
// reset the time-out counter
tic_ = 0;
// enable the time-out timer
Timer1->Enabled = true;
}
To hide a tooltip, use the ShowWindow() API function. This function is called from within the TForm1::DoHideHint() method:
void __fastcall TForm1::DoHideHint()
{
  const HWND hHint =HintWindow_->Handle;

  // is the tooltip displayed?
  const bool showing =
    IsWindowVisible(hHint);

  if (showing)
  {
    // hide the tooltip
    ShowWindow(hHint, SW_HIDE);

    // disable the time-out timer
    Timer1->Enabled = false;
  }
}Although you now have methods to easily show and hide tooltips, you still need to know when to call these functions. Well, because you want to show a tooltip for each of the list boxÆs items, you can use the list boxÆs OnMouseMove event to: (1) determine which item, if any, the mouse cursor is over, and then use that information to decide which tip to display; and (2) determine the coordinates at which to display the tooltip. HereÆs the code for that:
void __fastcall TForm1::
  ListBox1MouseMove(TObject *Sender,
    TShiftState Shift, int X, int Y)
{
  // find the item that's hit, if any
  TPoint PMouse = Point(X, Y);
  const int current_index =
    ListBox1->ItemAtPos(PMouse, true);

  // if an item is and it's not the
  // last item that was hit...
  if (current_index != last_index_ &&
      current_index != -1)
  {
    // display the tooltip
    DoActivateHint(
      ListBox1->ClientToScreen(PMouse),
      HintList_->Strings[current_index]
      );
  }
  else if (current_index == -1)
  {
    // dismiss the tooltip
    DoHideHint();
  }

  // update the last index
  last_index_ = current_index;
}
Notice that I used the private last_index_ member to prevent the same tooltip from displaying multiple times when the mouse cursor moves over the current (same) item. Also notice that the DoHideHint() method is called when no item is hit (i.e., current_item == -1). You will also want to call this method when the user clicks a mouse button. For this latter task, use the list boxÆs OnMouseDown event, like so:
void __fastcall TForm1::
  ListBox1MouseDown(TObject *Sender,
    TMouseButton Button,
    TShiftState Shift, int X, int Y)
{
  // dismiss the tooltip
  DoHideHint();
}For most situations, youÆll want to dismiss your tooltip after a given amount of time as passed. For this example, I used a TTimer object (and the tic_ member). HereÆs the code for Timer1Æs OnTimer event handler:
void __fastcall TForm1::
  Timer1Timer(TObject *Sender)
{
  // time-out counting...
  if (++tic_ > MAXTIC)
  {
    DoHideHint();
  }
  // cursor position checking...
  else
  {
    // extract position of the cursor
    POINT PMouse = {0};
    GetCursorPos(&PMouse);

    // grab the screen-relative position
    // of the target control
    RECT RListBox = {0};
    GetWindowRect(
      ListBox1->Handle, &RListBox
      );

    // if the mouse cursor is beyond
    // the bounds of the list box...
    if (!PtInRect(&RListBox, PMouse))
    {
      // clear the last index
      last_index_ = -1;

      // dismiss the tooltip
      DoHideHint();
    }
  }
}
Notice that the Timer1Timer() method actually serves two purposes. First, it hides the tooltip after a specified interval; this interval depends on MAXTIC and the value of Timer1Æs Interval property. Second, the function queries the current position of the mouse cursor and then hides the tooltip if the cursor goes beyond the bounds of the list box. (You can also use the CM_MOUSELEAVE message for this purpose, but itÆs a good idea to back this message up with a timer.)
In addition to using the THintWindow class as-is, you can also create a THintWindow descendant class and then use this class as a separate object (as described in the previous example). For instance, suppose that you have a tree view that contains items that correspond to different animals. As depicted in Figure B, you can use a THintWindow descendant class to display a tooltip for each nodeŚspecifically, a tooltip that contains an image of the corresponding animal.
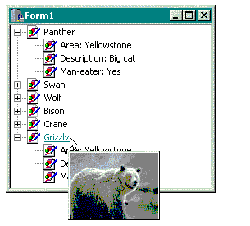
Figure B: A tree view with per-item image-based tooltips.
Creating a tooltip that contains an image is actually much simpler than you might think. Remember, the THintWindow class is a TWinControl descendant; this means that you can parent other child controls onto the tooltip. In this case, all you need to do is create a THintWindow descendant class that contains a TImage object. The following example creates such a class, which IÆll call TImageHintWindow. The declaration of this class is provided in Listing B.
Notice from Listing B that the TImageHintWindow class contains one private member: Image_. This memberŚwhich is exposed via the TImageHintWindow::Image propertyŚis simply the TImage object that the tooltip will contain. All that is required is to create the Image and set a few of its properties. This can be done in the class constructor:
__fastcall TImageHintWindow::
  TImageHintWindow(TComponent* Owner)
   : THintWindow(Owner)
{
  Image_ = new TImage(this);
  Image_->Parent = this;
  Image_->AutoSize = true;
  Image_->Left = 1;
  Image_->Top = 1;

  // prevent the Image from
  // processing mouse messages
  Image_->Enabled = false;
}
The next task is to override the CalcHintRect() method. Remember, this function is used to query the size of the tooltip for a given caption (and font). But, because the tooltip doesnÆt display a caption, you can simply implement CalcHintRect() to return the size of the image, like so:
TRect __fastcall TImageHintWindow::
  CalcHintRect(int MaxWidth,
    const AnsiString AHint, void* AData)
{
  TRect HintRect = Image_->ClientRect;
  HintRect.Right += 4;
  // HintRect.Bottom is increased by
  // 4 pixels in the THintWindow class
  return HintRect;
}ThatÆs it for the TImageHintWindow class. LetÆs now put it to good use.
The code to manage a TImageHintWindow object (for the tree view) is similar to that of the list box-related example. As before an instance of the tooltipÆs class is created from within Form1Æs constructor, like so:
__fastcall TForm1::TForm1(
  TComponent* Owner) : TForm(Owner),
  last_node_(NULL)
{
  HintWindow_ =
    new TImageHintWindow(this);
  HintWindow_->Brush->Color = clWindow;
}
Note that this time HintWindow_ is declared as a TImageHintWindow* (as opposed to the previous example). And, whereas in the previous example I used a TStrings*-type member (HintList_) for the list of tips, this time I use a TImageList component (HintImageList) that contains the list of images. Listing C contains the declaration of the TForm1 class for this example.
Because you donÆt have to fuss with the tooltipÆs caption, the DoActivateHint() method actually becomes slightly simpler:
void __fastcall TForm1::DoActivateHint(
  const TPoint& P)
{
  // compute the tooltip's rect
  TRect HintRect =
    HintWindow_->CalcHintRect(
      0, NULL, NULL
      );

  // position the tooltip's rect
  OffsetRect(
     static_cast<PRECT>(&HintRect),
     P.x + 10, P.y + 10
     );

  // display the tooltip
  HintWindow_->ActivateHint(
    HintRect, NULL
    );

  // reset the time-out counter
  tic_ = 0;

  // enable the time-out timer
  Timer1->Enabled = true;
}
Now simply use the tree viewÆs mouse-related events to incite the tooltips. This time I use the TTreeView::GetNodeAt() method to query the ōhitö node, and the TImageHintWindow::Image property to set the tooltipÆs image (which is extracted from the image list via the TImageList::GetBitmap() method). HereÆs the code:
void __fastcall TForm1::
  TreeView1MouseMove(TObject *Sender,
    TShiftState Shift, int X, int Y)
{
  // find the node that's hit, if any
  TTreeNode* current_node =
    TreeView1->GetNodeAt(X, Y);

  // if a node is hit and it's not the
  // last node that was hit and it's
  // not a child node...
  if (current_node &&
      current_node != last_node_ &&
      current_node->Level == 0)
  {
    // set the image to display
    HintImageList->GetBitmap(
     current_node->Index,
     HintWindow_->Image->Picture->Bitmap
    );

    // display the tooltip
    DoActivateHint(TreeView1->
      ClientToScreen(Point(X, Y))
      );
  }
  else if (!current_node ||
           current_node->Level > 0)
  {
    // dismiss the tooltip
    DoHideHint();
  }

  // update the last node
  last_node_ = current_node;
}

void __fastcall TForm1::
  TreeView1MouseDown(TObject *Sender,
    TMouseButton Button,
    TShiftState Shift, int X, int Y)
{
  // dismiss the tooltip
  DoHideHint();
}
The timer-related code is virtually identical to that of the previous example; you simply change the Timer1Timer() method to use the tree viewÆs bounding rectangle instead of the list boxÆs, and you clear last_node_ instead of last_index_.
IÆve just shown you an example of creating and using a THintWindow descendant class that displays an image. You might have noticed from this example that creating the descendant class was the easy part; most of the work involved implementing the code to display the tooltips. (In newer versions of C++Builder you can avoid much of this work by using the TApplication::ActivateHint() method.)
Suppose you create a THintWindow descendant class that you want displayed for every control within your application. You certainly donÆt want to deal with manually displaying a tooltip for every control. As it turns out, the VCL provides a simple solution: the global HintWindowClass variable.
By using the HintWindowClass variable, you can instruct the TApplication class to use your THintWindow descendant class for all tooltips that your application will display. For example, if you create a THintWindow descendant class called TMyHintWindow, youÆd use the HintWindowClass variable like so:
__fastcall TForm1::TForm1(
  TComponent* Owner) : TForm(Owner)
{
  HintWindowClass =
    __classid(TMyHintWindow);
}
This code instructs the TApplication class to create and maintain an instance of the TMyHintWindow class instead of the default THintWindow class. This provides an easy way to replace all tooltips in your application.
IÆve demonstrated how to use the THintWindow class to display your own tooltips for a list box and a tree view. Similar techniques can be used to display tooltips for other controls. You can download the source code for both of these examples from www.bridgespublishing.com.
Listing A: The declaration of the TForm1 class for the list-box-related example
#include <memory>
class TForm1 : public TForm
{
__published:
  TListBox *ListBox1;
  TTimer *Timer1;
  void __fastcall ListBox1MouseMove(
    TObject *Sender, TShiftState Shift,
    int X, int Y);
  void __fastcall ListBox1MouseDown(
    TObject *Sender, TMouseButton Button,
    TShiftState Shift, int X, int Y);
  void __fastcall Timer1Timer(
    TObject *Sender);

private:
  int last_index_;
  unsigned char tic_;
  THintWindow* HintWindow_;
  std::auto_ptr<TStrings> HintList_;

protected:
  virtual void __fastcall DoActivateHint(
    const TPoint& P, AnsiString TipText);
  virtual void __fastcall DoHideHint();

public:
  __fastcall TForm1(TComponent* Owner);
  const static unsigned char MAXTIC = 10;
};
Listing B: The declaration of the TImageHintWindow class
class TImageHintWindow : public THintWindow
{
__published:
  __property TImage* Image =
    {read = Image_, write = Image_};

private:
  TImage* Image_;

public:
  __fastcall TImageHintWindow(
    TComponent* Owner);

  // we'll override this method
  virtual TRect __fastcall CalcHintRect(
    int MaxWidth, const AnsiString AHint,
    void* AData);
};
Listing C: The declaration of the TForm1 class for the tree view-related example
#include "ImageHintWindow.h"
class TForm1 : public TForm
{
__published:
  TTreeView *TreeView1;
  TImageList *ImageList1;
  TImageList *HintImageList;
  TTimer *Timer1;
  void __fastcall TreeView1MouseMove(
    TObject *Sender, TShiftState Shift,
    int X, int Y);
  void __fastcall TreeView1MouseDown(
    TObject *Sender, TMouseButton Button,
    TShiftState Shift, int X, int Y);
  void __fastcall Timer1Timer(
    TObject *Sender);

private:
  TTreeNode* last_node_;
  unsigned char tic_;
  TImageHintWindow* HintWindow_;

protected:
  virtual void __fastcall DoActivateHint(
    const TPoint& P);
  virtual void __fastcall DoHideHint();

public:
  __fastcall TForm1(TComponent* Owner);
  const static unsigned char MAXTIC = 10;
};