You can download sample files from our Web site as part of the file jan99.zip. Visit www.zdjournals.com/cpb and click on the Source Code hyperlink.
Context-sensitive Help is a feature of Windows applications that users have come to expect. Most of the time, Help is invoked via the application's Help menu. Some Windows programs, however, go the extra mile: These programs provide a Help button on the toolbar for easy access to the program's context Help. When you click the Help button, the mouse pointer changes to display a Help cursor. Clicking on a menu, button, or edit control with the Help cursor displays a Help topic on that particular control. In this article, we'll show you how to implement a Help toolbar button on your main form. We'll also demonstrate how to implement the stock Windows Help button in a dialog box (the button that Windows puts on the title bar next to the close button).
Help mode, which determines whether or not the user is seeking Help on a
topic
| A Help button on the toolbar that toggles Help mode on and off
| A Help cursor indicating to the user that Help mode is on
| A Help file or other message system that displays Help information to users
when they click on an item in Help mode
| |
We'll examine each of these design points in the following sections.
bool HelpMode;This article's example program declares HelpMode in the private section of the form's class. You can declare the variable in the public, private, or protected section, as you see fit. When HelpMode is true, you'll display Help information to the user when a UI element (menu, button, or control) is clicked. When HelpMode is false, the program will operate normally. Take the File | Open menu item, for example. The OnClick handler for that menu item might look like this:
void __fastcall
TForm1::Open1Click(TObject *Sender)
{
  if (HelpMode)
    ShowMessage("Help for File|Open.");
  else
    if (OpenDialog->Execute())
    {
      Memo->Lines->
        LoadFromFile(OpenDialog->FileName);
    }
}
As
you can see, if HelpMode is true, the code displays a message to the user. If
HelpMode is false, the code shows the standard Open dialog box and loads the
selected file into a memo. Note that you use ShowMessage to display simple text
to the user. In a real Help system, you'd call the Application object's
HelpContext method to display your Help file with the selected topic.
You must consider one other aspect regarding Help mode. Should Help mode shut
off immediately after the user chooses a menu item or control, or should the
user be required to turn off Help mode by clicking the Help button a second
time (a toggle)? The default Windows behavior is to shut off Help mode
immediately after the user selects an item. When used in this way, Help mode
could be considered a one-shot event. If you implement this method, you'll need
to add a line of code in your OnClick events to shut off Help mode after
displaying the Help topic:HelpMode = false;On the other hand, if your Help mode button acts as a toggle, then you may also need to modify the Help button on the toolbar (we'll address that in the next section). Regardless of your Help mode operation, you should probably allow the user to click the Help button again to turn off Help mode, in case it was turned on accidentally.
A bitmap that's representative of the task the button performs
| Optionally, a Toggle mode that makes the button stay down until the user
clicks the button again to turn off Help mode
| Code to toggle the Help mode on and off
| |
For the toolbar's bitmap, you can use any bitmap that you feel represents Help mode. The example program available at the C++Builder Developer's Journal Web site contains a bitmap that you can use for the Help button, if you like.
As we discussed in the preceding section, you should decide whether you want your Help mode to be a toggle (on until it's shut off again) or a one-shot event. If your Help mode will be a toggle, you'll need to set properties for the toolbar button accordingly. In C++Builder 3, set the toolbar button's AllowAllUp property to true, and the Style property to tbsCheck. For C++Builder 1, see the TSpeedButton Help for instructions on how to make a speed button act as a toggle.
Even if your Help mode is a one-shot event, you may elect to have the Help mode toolbar button stay down while Help mode is in effect. If you go this route, you'll need to pop up the toolbar button programmatically when Help mode terminates. You can accomplish that with just one line of code:
HelpModeBtn->Down = false;The toolbar button's OnClick event handler either turns on Help mode or toggles the Help mode. As we stated earlier, you should probably treat the toolbar button as a toggle, so the user can turn it off at any time. Given that, your OnClick event handler can contain just one line of code:
HelpMode = !HelpMode;This code turns Help mode on if it's currently off, or off if it's currently on. It's as simple as that.
void __fastcall
TForm1::WmSetCursor(TWMSetCursor& Message)
{
  if (HelpMode) {
    HCURSOR cursor = LoadCursor(NULL,
       IDC_HELP);
    ::SetCursor(cursor);
    Message.Result = true;
  }
  else TForm::Dispatch(&Message);
}
If
the HelpMode variable is true, you call the Windows API function LoadCursor,
passing NULL for the hInstance parameter and IDC_HELP for the final parameter.
Doing so causes Windows to load its built-in Help cursor into the cursor
variable. Now, the API function SetCursor is called to actually change the
cursor.
| Note: Global scope In our example, double colon precedes the SetCursor function name (::). This is necessary because the TForm class has a protected method called SetCursor, as does the Windows API. The double-colon global scope operator tells the compiler to use the global scope SetCursor function, rather than the local scope SetCursor function. Use the global scope operator any time you need to call a Windows API function when the VCL has a function by the same name. |
Most of the time, you'd write the calls to SetCursor and LoadCursor all on one line, like so:
::SetCursor(LoadCursor(NULL, IDC_HELP));We broke the code into multiple lines in the preceding example to make it more readable. You might be wondering if all of this is completely necessary. After all, you can use the Screen object's Cursor property to control the application's cursor, right? That's true, but only up to a point. Specifically, changing the Cursor property will change the cursor when the mouse pointer is over the client area of the form--but not when the pointer is over the menu. You want the Help cursor to be displayed even when over the menu, and you must drop to the API level to accomplish that effect.
You can also change the application's cursor to the Help cursor by sending the form a WM_SYSCOMMAND message with a WPARAM of SC_CONTEXTHELP. When you click on a control on the form, the form will receive a WM_HELP message and the cursor will be automatically set back to the arrow cursor. Your application can then catch the WM_HELP message or assign an event handler for the Application object's OnHelp event. The handler could display any Help topic, based on the control clicked. This method, while attractive at first glance, suffers from the same limitation as setting the screen's Cursor property--it doesn't work when a menu item is clicked.
Figure A: This dialog box's Help cursor is enabled.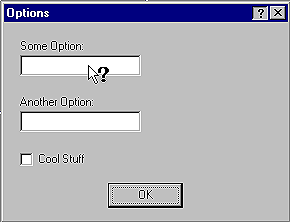
Clicking on a control with the Help cursor will result in a WM_HELP message being sent to the form. This message is handled by VCL at the application level, and the Help file page associated with the control clicked will be displayed in a pop-up window. It's all more or less automatic. More or less--but it isn't totally automatic, because, in order to get this behavior, you must perform the following tasks:
Set the form's BorderStyle property to bsDialog.
| Add the biHelp element to the BorderIcons property (a set).
| Assign a Help file to the application (either in the IDE or via the
HelpFile property of the Application object).
| Assign context IDs for each topic in the Help itself.
| Set the HelpContext property for each component for which context Help
is enabled.
| |
As we stated earlier, clicking on a control with the Help cursor results in the form receiving a WM_HELP message. While the Help button on a dialog box is handled more or less automatically by the VCL, you can still catch this message yourself if you want to perform some special processing when the user clicks on a control with the Help cursor. Once again, you'll have to implement a VCL message map. Your message handler will receive a reference to a TWMHelp structure. The TWMHelp structure contains a member called HelpInfo, which is a pointer to a Windows HELPINFO structure. You could use the information in the HELPINFO structure to determine what control was clicked. For example:
void __fastcall TForm2::WmHelp(TWMHelp&
    Message)
{
  if (Message.HelpInfo->hItemHandle
      == Edit1->Handle)
    ShowMessage(
      "Show Help for edit control #1.");
  // etc.
}
It
may rarely be necessary for you to handle the WM_HELP message yourself, but you
certainly have that flexibility, if needed. The listings at the end of this
article don't show the source code for the example application's Options dialog
box. You can, however, download the code for this article from our Web site and
try the Help button in the Options dialog box. Click on any control in the
dialog box, and a Help topic will be displayed.
Listing A: HELPCURS.H
#ifndef HelpCurUH
#define HelpCurUH

#include <Classes.hpp>
#include <Controls.hpp>
#include <StdCtrls.hpp>
#include <Forms.hpp>
#include <ComCtrls.hpp>
#include <Menus.hpp>
#include <ToolWin.hpp>
#include <Dialogs.hpp>

class TForm1 : public TForm
{
__published:  // IDE-managed Components
  TMainMenu *MainMenu1;
  TMenuItem *File1;
  TMenuItem *Exit1;
  TMenuItem *N2;
  TMenuItem *Save1;
  TMenuItem *Open1;
  TToolBar *ToolBar1;
  TToolButton *FileOpenBtn;
  TToolButton *FileSaveBtn;
  TToolButton *ToolButton3;
  TToolButton *HelpModeBtn;
  TImageList *ImageList1;
  TMemo *Memo;
  TOpenDialog *OpenDialog;
  TSaveDialog *SaveDialog;
  TMenuItem *Tools;
  TMenuItem *Options1;
  void __fastcall Open1Click(TObject *Sender);
  void __fastcall
    HelpModeBtnClick(TObject *Sender);
  void __fastcall Save1Click(TObject *Sender);
  void __fastcall Exit1Click(TObject *Sender);
  void __fastcall
    Options1Click(TObject *Sender);
private:	// User declarations
  bool HelpMode;
  void DoHelp(int ID);
  void __fastcall
    WmSetCursor(TWMSetCursor& Message);
public:    // User declarations
  __fastcall TForm1(TComponent* Owner);
  BEGIN_MESSAGE_MAP
    MESSAGE_HANDLER(
      WM_SETCURSOR, TWMSetCursor, WmSetCursor)
  END_MESSAGE_MAP(TForm)
};

extern PACKAGE TForm1 *Form1;

#endif
Listing B: HELPCURS.CPP
#include <vcl.h>
#pragma hdrstop

#include "HelpCurU.h"
#include "Options.h"

#pragma package(smart_init)
#pragma resource "*.dfm"
TForm1 *Form1;

__fastcall TForm1::TForm1(TComponent* Owner)
  : TForm(Owner)
{
  // Set the Help mode to false initially.
  HelpMode = false;
}

void __fastcall
TForm1::Open1Click(TObject *Sender)
{
  // If Help mode is on, then call the
  // DoHelp function. If not, display the File.
  // Open dialog box. The event handlers for the
  // other menu items follow the same pattern.
  if (HelpMode)
    DoHelp(1);
  else
    if (OpenDialog->Execute())
    {
      Memo->Lines->
        LoadFromFile(OpenDialog->FileName);
    }
}

void __fastcall
TForm1::Save1Click(TObject *Sender)
{
  if (HelpMode)
    DoHelp(2);
  else
    if (SaveDialog->Execute())
    {
      Memo->Lines->
        SaveToFile(SaveDialog->FileName);
    }
}

void __fastcall
TForm1::Exit1Click(TObject *Sender)
{
  if (HelpMode)
    DoHelp(3);
  else
    Close();
}

void __fastcall
TForm1::Options1Click(TObject *Sender)
{
  if (HelpMode)
    DoHelp(4);
  else
    Form2->ShowModal();
}

void __fastcall
TForm1::HelpModeBtnClick(TObject *Sender)
{
  // Toggle the Help mode.
  HelpMode = !HelpMode;
}

void TForm1::DoHelp(int ID)
{
  // Show the Help file with the given ID.
  Application->HelpContext(ID);
  // Reset Help mode to off.
  HelpModeBtn->Down = false;
  HelpMode = false;
}

void __fastcall
TForm1::WmSetCursor(TWMSetCursor& Message)
{
  // If the Help mode is on, then we'll handle
  // the cursor changes ourselves.
  if (HelpMode) {
    // If the cursor is over the client window,
    // then display the 'NO' cursor.
    if (Message.CursorWnd == Memo->Handle)
      ::SetCursor(LoadCursor(NULL, IDC_NO));
    else
      // Otherwise display the Help cursor.
      ::SetCursor(LoadCursor(NULL, IDC_HELP));
    Message.Result = true;
  }
  // If Help mode is not on, then let VCL and
  // Windows handle the message.
  else TForm::Dispatch(&Message);
}