This appendix outlines all of the instructions for assembling MacCharlie and connecting it to your Macintosh
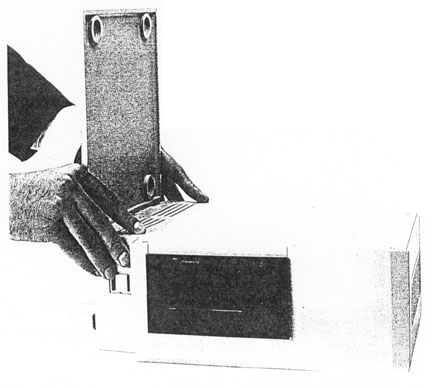
When vou first take the MacCh.arlie System Unit out of the carton, there are two separate pieces The body has the same profile as the Macintosh and the base is a flat plate with three teeth protruding up on one end. In the carton, the base was packed immediately underneath the body.
It is not necessary to remove the cover of the MacCharlie system unit or the access panel in the process of assembling the two parts together.
WARNING: For anyone other than an Authorized MacCharlie Dealer, removing the cover of the system unit or keyboard extension invalidates the warranty. Please study the photograph prior to inserting the base into the body of the system unit.
To assemble the base to the body, you must insert the teeth protruding from the base through the matching slots on the lower inside corner of the body of the system unit. Hold the base perpendicular to the access panel, which is the inside facing plate on the body, and slide the teeth all the way into the slots You will feel them click as they lock into place. When assembled, the base and the bottom of the body should form one smooth continuous bottom of the system unit.
After you have snapped the base in place, it is locked and can only be removed by loosening the three bottom screws holding the access panel in place. When these have been loosened, the teth on the base can be pulled out of the slots in the body. Even this can be done without removing the cover of the system unit. However it is usually not necessary to do this. Under most situations, you simply leave the system unit permanently assembled once you have put it together.
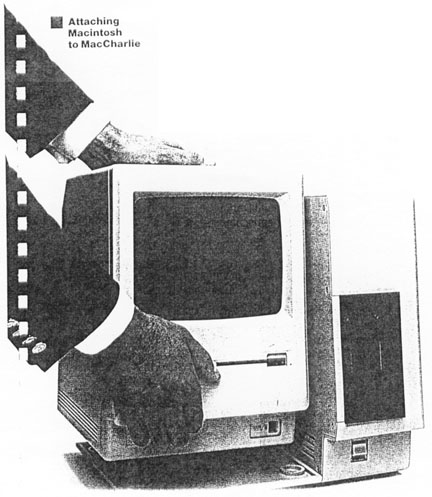
First, turn off your Macintosh and disconnect the power cord from the back. If you have an Imagewriter printer connected, disconnect it from the Macintosh as well. You can leave all other connections intact.
Place your MacCharlie system unit on a flat surface. Lift your Macintosh monitor by the handle and set it on the base of the MacCharlie system unit, making sure that the four feet on the Macintosh fit into the corresponding recesses on the top of the MacCharlie base.
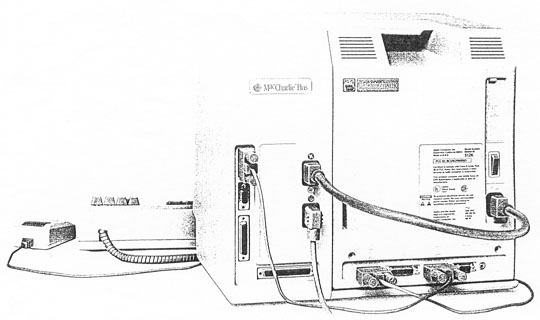
Locate the two short cords provided with MacCharlie. One of them is obviously a power cord. The other is the soignal interconnect cord, recognized by its two 9-pin D-type serial connectors.
Position the MacCharlie/Macintosh combination so that you have a clear view of all the conections on the back of both units. Take the short power cord and plug the female end of it into the Macintosh power receptacle. Plug the male end of the cord into the female power receptacle on the back of MacCharlie.
Connect one end of the signal interconnect cord to the Imagewriter printer port on the back of the Macintosh. Connect the other end to the printer port on the back of the Macintosh. Connect the other end to the upper 9-pin serial port on the back of MacCharlie, opposite the power cord that is already connected. Tighten the two knurled knobs on each connector to seat them firmly in place.
Connect you Imagewriter printer cable, if you have one, to the second (and only remaining) 9-pin serial port on the back of MacCharlie.
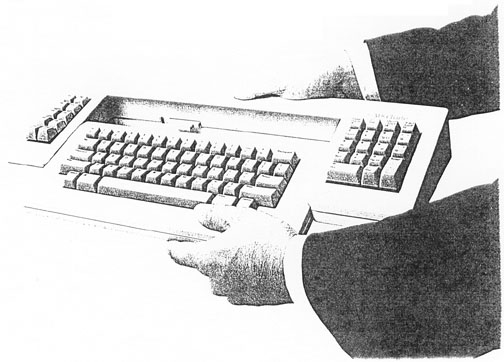
Be sure to disconnect the cable from the back of your Macintosh keyboard prior to beginning the assembly of the keyboard.
To assemble the keyboard, you simply slide the Macintosh keyboard into the open end of the "U" of the MacCharlie keyboard extension. Refer to the photograph to see how to start this procedure. When you have started the Macintosh keyboard sliding in, insert the connector on the end of the short cord on the inside of the MacCharlie keyboard extension into the back of the Macintosh keyboard.
As the Macintosh keyboard slides all the way in, you will feel a slight click as it locks in place. It is held in by friction, and should stay firmly in place through all normal usage, including moving the keyboard around or transporting it in a carrying bag.
Once the keyboards are firmly attached, connect the Macintosh keyboard cable to the jack on the front of the Macintosh and to the similar jack on the rear of the MacCharlie keyboard extension. The keyboard is now completely assembled.
Make sure that the power switch on the front of MacCharlie is in the "off" position by pushing the end of the rocker to make it flush with the surface. Plug the power cord that came with your Macintosh into the remaining power receptacle on the back of MacCharlie, and then plug the other end into the electrical power wall outlet. Turn the power switch on the left rear of your Macintosh to on by pressing the "1" This is the last time you will have to touch that switch, as long as MacCharlie remains connected.
The assembly is now complete. All you need to do to begin operating either your Macintosh or MacCharlie is to turn on the power switch on the front of MacCharlie. When you turn the switch on, the light illuminates to show you that you have power connected.
Wasn't that easy? Now you are ready for many hours of satisfaction using your Macintosh by itself or in conjunction with MacCharlie to run software written for the IBM PC.