
Chapter 1 Contents
11 Introduction
12 Meet Your MacCharlie
14 What MacCharlie Is: Its Parts
15 The MacCharlie System Unit
16 The MacCharlie Keyboard Extension
16 The MacCharlie Application Software
17 What MacCharlie Does
17 MacCharlie As a Separate Computer
17 Macintosh as a Terminal for MacCharlie
18 The Equipment You Need
18 The Connection
19 Getting Started
19 The Flow of Work
19 The MacCharlieWindow
19 Using the Mouse
20 Whats a MacCharlie Document?
20 Using MacCharlie
22 Setting Up a MacCharlie Document
24 Getting Out of MacCharlie and Back Into Macintosh
You're about to learn a new way to use your.Macintosh personal computer. If you have not experienced using "traditional" computers, you will find using MacCharlie to run IBM PC software somewhat different from the techniques you have used with your Macintosh.
If you are a brand new Macintosh user, become somewhat familiar with your Macintosh on its own before starting to use MacCharlie. Read through Macintosh and follow along on your own machine, experimenting and trying all of the examples. A short amount of time spent doing this now will save you more time later.
The MacCharlie application software is on the 3 1/2 inch disk you found when you unpacked MacCharlie. It is similar to other Macintosh application software packages, and it will become familiar as you use it.
With this software and your MacCharlie hardware, you will be able to tap the large library of IBM PC software using your Macintosh.
This chapter familiarizes you with the MacCharlie terminology used throughout the manual. With this familiarity, you will be ready to go on to the next chapter and learn how to run applications.

Reading the manual is not the first thing most people do when they get a new computer product. If you're in this majority, you probably pulled MacCharlie's components out of the carton, hesitating only long enough to be sure you didn't connect it incorrectly. Let's introduce those components and the terminology that we use in this manual.
As you opened the top of the carton containing your MacCharlie, you found a box and a three ring binder in a slipcover, each packed in separate recesses in the top of the foam protective material. The box contained this manual, entitled MacCharlie (which is the one you should have begun reading first), and, underneath, a 3 1/2 inch disk containing the MacCharlie application software. The other manual, which was in the slipcover, is entitled MacCharlie MS-DOS. When you reach the appropriate place in Chapter 2 of this manual, you will be introduced to it.

After you put the two manuals and the disk aside and continued unpacking your MacCharlie, you found four objects packed inside the foam. The largest looked like a side view of your Macintosh, but much thinner. When you removed it from the foam, you found a flat section beneath it. These two pieces, called the body and the base, respectively, make up the MacCharlie system unit, which is one of the two main hardware components of MacCharlie.
Since you will probably not wait to read the detailed assembly instructions provided in Appendix B, the following discussion tells you how to fasten the base to the body of the system unit. You do not need to and should not remove the cover from the body of the system unit.
WARNING: Removing the cover of the system unit or keyboard by anyone other than an Authorized Dayna Dealer invalidates the warranty. Please study the photograph prior to inserting the base into the main part of the system unit.
Insert the flat section, or base, into the body of the system unit, as shown in the photograph. After you snap it in, it is locked in place. When the base is locked, it can only be removed by loosening the three screws holding the bottom edge of the facing plate in place.

The next component in the foam packing was an elongated U-shaped object with separate small keyboard sections on both ends. This was the keyboard extension unit.
The last object was a package containing two electrical cords. They are used to connect MacCharlie to your Macintosh, as explained later in this chapter.
The package should have contained a short power cord with one male and one female three-hole plug on the ends and a second lighter cord with identical nine-pin D-type female connectors on both ends.
This is MacCharlie.
If anv of the items in the carton were missing, damaged, or otherwise defective when you unpacked them, you should immediately contact your Authorized Dayna Dealer. He will assist you in getting replacements for any defective or missing items.
The MacCharlie system has three parts:
1. the system unit (also called the microprocessor unit), which is made up of the base and the body
2. the keyboard extension
3. the MacCharlie application software
The first two parts are items that you can see and touch, the hardware components of MacCharlie. Software is information in the form of data and instructions, stored in memory or on aisks. The MacCharlie application software comes to you stored on the enclosed 3 1/2 inch disk.
The system unit contains the MacCharlie processor. memory, the built-in disk drive or drives, the circuit boards, the power supply, fan, and all of the associated electronic components.
The processor does the actual work of the MacCharlie computer, separately and distinctly from the processor in your Macintosh. Memory is where MacCharlie stores your data and programs when you use an IBM PC application. Two types of memory are present, Read Only Memory (ROM) and Random Access Memory (RAM). Both types are separate from the memory in your Macintosh.
The RAM in the basic MacCharlie system has 256 thousand bytes (abbreviated KB), meaning 256,000 characters of data or instructions can be stored and retrieved. MacCharlie Plus has 640 KB of RAM. The information stored in RAM can come directly from you, through the keyboard, or from a disk in one of the disk drives. MacCharlie has one drive; MacCharlie Plus has two. The circuit boards, power supply, and associated electronic components are all enclosed in the case.

The Macintosh keyboard slides into the MacCharlie keyboard extension and locks in place. See Appendix B for a detailed discussion of how to slide the Macintosh keyboard into the MacCharlie keyboard extension and connect it. This keyboard extension contains two sets of keys: ten function keys on the left and an eighteen-key numeric keypad on the right. The IBM PC functions of all keys are explained in Appendix C. Specific functions for each key depend on the application programs you purchase, and are detailed in their manuals.

The function keys and the numeric keypad are operable any time they are called for by an IBM PC application program running on MacCharlie. These keypads enable several specific functions used by IBM PC software. When the Macintosh is running and MacCharlie is idle, the function keys are inactive, and the numeric keypad is identical to the optional numeric keypad available for the Macintosh. See Macintosh for a detailed description of the numeric keypad.
With the Macintosh keyboard placed in the keyboard extension, the combination becomes a functional duplicate of the IBM PC keyboard. Chapter 3 describes it in further detail.
The MacCharlie software is among the most exciting things about MacCharlie. It is the bridge between your Macintosh and the vast array of IBM PC software that you can run on the system. It opens the door to a universe of personal computer applications which is expanding in all directions, from editors to spreadsheets to databases to communications, usable in offices, homes, schools, and everywhere that Macintoshes and IBM PCs are used.
The MacCharlie software enables MacCharlie to perform as the most powerful and versatile tool in the Macintosh world.
When MacCharlie is conected to your Macintosh, you can:
MacCharlie has its own separate processor and RAM. Its disk drive(s), keyboard extension, communications port, and bus extension connector make up MacCharlie's input devices. Similarly, output devices can be connected to printer and communications ports or via the bus extension connector. With these characteristics, MacCharlie is very much a microcomputer all by itself. But, it has limitations. Its keyboard extension does not make up a complete keyboard, and without a monitor, it has no way to tell the operator whether MacCharlie is getting the right information or doing what is wanted.
What MacCharlie needs to function is a terminal, to communicate to the operator what is happening and to allow the operator to tell it what to do next.
A terminal's basic job is to send information to and receive information from a computer, and to provide the link between the operator and the computer. A terminal usually has a keyboard for entering information and a display to permit the operator to see what the terminal is receiving and sending.
Your Macintosh provides this display monitor and basic keyboard. MacCharlie's keyboard extension completes the keyboard.
The Macintosh is also a very powerful computer in its own right. It has many features which make it very advanced in the world of microcomputers, such as the high resolution screen, bit-mapped graphics and the high-speed Motorola 68000 microprocessor. At the same time, MacCharlie complements the Macintosh very well, expanding its capabilities even further.
Your Macintosh is able to communicate with MacCharlie and with you, the operator, without giving up any of its power as an independent computer. In simplified terms, Macintosh functions as a terminal for MacCharlie, while retaining all of its own flexibility and capability. As a terminal, your Macintosh can transfer information to and from MacCharlie and gain access to the data bases, applications, storage capacity, and processor of MacCharlie.
What do you need to make MacCharlie work? Nothing more than a Macintosh personal computer. It doesn't matter whether your Macintosh has 128 KB or 512 KB of memory; either will work equally well. You do not necessarily need a printer, but it is worthwhile. It allows you to have hard copy output of your work. MacCharlie can use the Imagewriter printer which complements your Macintosh, or any serial printer that is compatible with the IBM PC.
Of course, you need diskettes for MacCharlie's disk drives. You'll also want extra 3 1/2 inch disks for the Macintosh if you plan to transfer files or documents back and forth between MacCharlie and Macintosh. Everything else you need comes with MacCharlie: the MacCharlie application software disk and the diskettes containing MS-DOS and the GW BASIC Interpreter.
For Macintosh and MacCharlie to function together, they must be properly connected. Appendix B gives a detailed discussion of how this is done. Once it's connected, you normally do not have to disconnect or change any of the connections again unless you need to move your Macintosh and MacCharlie apart from each other. You can switch freely between using your Macintosh and using IBM PC software in MacCharlie without disturbing any connections.
If you haven't already done so, set up MacCharlie now and connect your Macintosh to it by following the procedures outlined in Appendix B.
The power switch on the front of MacCharlie turns both computers on and off at the same time.
If your Imagewriter printer is properly connected to MacCharlie's Imagewriter printer port, then it responds to printing commands from MacCharlie. If MacCharlie is not holding a program in memory, the RAM functions as a printer buffer when Macintosh is printing on the Imagewriter. This feature allows you to continue with other work on your Macintosh instead of having to wait for the printer to finish printing your document.
Once you've connected MacCharlie to your Macintosh, you are ready to start learning what MacCharlie can do. As you continue to read this manual and try the features as they are discussed, you will soon become comfortable with most of MacCharlie's capabilities.
The following sections take you through a typical series of steps, summarized below, for setting up a working session on MacCharlie to use an IBM PC software application package:
The MacCharlie window is similar to the windows that you open on the Macintosh screen when you run other applications you can open it, size it, scroll it, move it, and close it. You cannot name it, though. It will always be titled MacCharlie. Within the window, you have a full 80 column by 25 line display, just as you would on the screen of an IBM PC.
Are you thoroughly familiar with using the mouse with your Macintosh? If you have any questions about it, please refer to Chapter 1 of Macintosh. Since MacCharlie menu and window operations are identical to those on other Macintosh applications, you need to be adept with the mouse.
The Macintosh mouse does most of the same things with a MacCharlie window as it does with any other windows on Macintosh. Use it to move, size or close the window, scroll the contents, or highlight text in the window for moving within the document or into another document.
Your MacCharlie document is simply the MacCharlie window and the work you're doing in it. That work, however, is being performed bv the MacCharlie processor using your IBM PC application software, rather than by the Macintosh microcomputer. This frees the Macintosh to record what it sees in the MacCharlie window, and whatever lines scroll off the top of that window.
This gives you some choices: if you will later want to review that work in the Macintosh environment, you can simply let it all be saved. If you have no need for such a record you can stop the recording and discard any lines saved. Or you can turn it on when the work is generating lines you want saved, and off when the interesting part is over. You can tell the Macintosh to start or stop recording any number of times while using MacCharlie. When you end the MacCharlie session all recorded lines are saved in a Macintosh document. You can review it rename it, or let it be reused the next time you restart MacCharlie.
Chapter 3 describes these options in detail.
Let's get started:
You start MacCharlie and open the MacCharlie window as follows:
1. Insert the MacCharlie application disk into the Macintosh disk drive and turn on both computers using the switch on the front of MacCharlie. The MacCharlie disk icon, labeled "MacCharl," appears on the desktop.

2. It it is not already selected select the MacCharlie disk icon The icon will then be highlighted, as it is on the screen above.
3. Choose "Open" from the File menu (or double-click the icon) to open the MacCharlie disk icon. In the MacCharlie disk window, you see icons for the MacCharlie application, the MacCharlie resource file, the System Folder, and the Empty Folder.
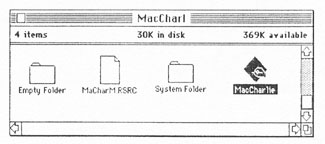
4. Double-click the MacCharlie application icon to open the MacCharlie window, or click on the icon to select it and then choose "Open" from the File menu.
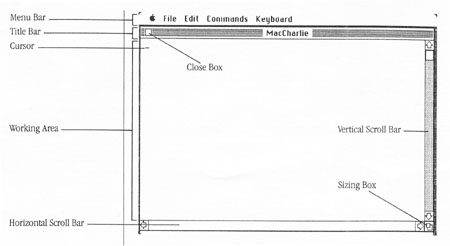
All of your work with IBM PC applications takes place within the MacCharlie window. The menu bar gives you access to the MacCharlie functions. The cursor indicates where your next keyboard input will appear on the screen. The scroll bars can be used only when you have filled the screen so that there's data to see that has scrolled off the top or off the right side of the screen display. When data has scrolled off the top of the display, this will be indicated by a dotted line across the top of the working area.
Once you open the MacCharlie window, you choose the options you want from the Commands and File menus. Your own familiarity with different PC applications will dictate which settings you should use. Although Chapter 3 discusses the Commands menu in detail, here is a brief introduction to its options.
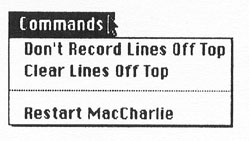
If you pull down that menu now, you will see several menu options. Click on "Don't Record Lines Off Top"; this will cancel the recording of lines that scroll off the top of the MacCharlie window. This menu option will then switch to read "Record Lines Off Top". For now, be sure to click again on this option: the word "Record" toggles back to say "Don't Record." "Clear Lines Off Top" discards any lines previously scrolled off the top and recorded. "Restart MacCharlie" resets MacCharlie to the startup state, i.e., as if you had just opened the MacCharlie window for the first time.
Chapter 3 also discusses the File Transfer options. Pull down the File menu now, and click on the "Page Setup" option to see the page printing options. These options will ensure that files you send from MacCharlie to your Imagewriter will print as you want them to on the page.
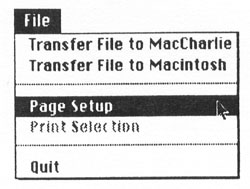
In the Page Setup window, you change the options by clicking the option title or the circle in front of the option title. You then confirm the settings by clicking the OK button, or cancel your choices by clicking the Cancel button.
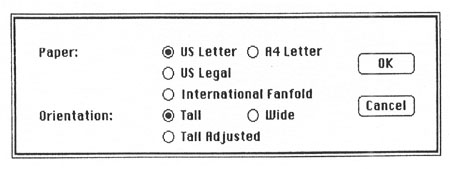
Once you have set up your page, you can then make your print selections. Select the "Print Selection" option on the File menu.

The Quality selections dictate the dot density in your printout. The higher quality settings take a correspondingly longer time to print. You can change the number of copies from the default setting of one by simply typing the desired number at the cursor location. Set the Paper Feed option to "Continuous" if you are using roll or fan fold paper, select "Cut Sheet" if you are using single sheets.
Both the Page Setup and Print Selection options can be changed at any time prior to actually printing your document.
You can exit from MacCharlie at any time, either by clicking on the window's close hox in the upper left-hand corner or by pulling down the File menu and selecting "Quit".
You will be asked if you wish to terminate the application running on MacCharlie. If you click on "No", the application is left running; if you click on "Yes", it is terminated. In either case, the MacCharlie window is closed, and you return to the Macintosh environment to proceed with your work there. Detailed explanations of the various menus, options, and results are provided in Chapter 3.