
29 Introduction
29 Drive Names
30 Presentation Conventions
30 Making MacCharlie Run
30 Booting the MacCharlie Applications Software Disk
31 Using MS-DOS
37 Loading Your IBM PC Application Software
37 Saving Your Work on a Diskette
38 MacCharlie's Other Features
38 Cutting. Copying. and Pasting
40 File Transfers
45 Printing
45 MacCharlie As a Printer Buffer
46 Using the On-Screen Keyboards
This chapter provides step-by-step instructions for some of the first tasks you will want to do using MacCharlie. You do not have to read the sections in any particular order because each topic is relatively independent of the others. Those that rely on other data or operations include cross-references to them.
Some of the MacCharlie menu commands are discussed in this chapter, because they are needed to accomplish the tasks covered here. Most commands, however, are not. Chapter 3 is the place to find explanations of all the commands and their associated options.
Certain terms have very specific meanings throughout this manual:
|
Disk drive |
Either a Macintosh disk drive or a MacCharlie disk drive. Context should clarify which kind is meant. |
|
Disk |
A Macintosh 3 1/2 inch disk |
|
Diskette |
A 5 1/4 inch MacCharlie floppy diskette |
If you are unfamiliar with floppy diskettes, please take a moment to refer to "Diskette Handling" in Chapter 3.
The MacCharlie disk drive is called drive A. If you have a MacCharlie Plus, with two disk drives, the drive on the left as you face it is A and the drive on the right is B. When you use the Macintosh disk drive(s) for input to or output from MacCharlie, the internal Macintosh drive is called drive C and the external Macintosh drive, if present, is D.
You can set up part of your MacCharlie RAM as RAM disk. RAM disk is a section of memory that pretends to be a disk drive. Input to and output from RAM disk is very fast. RAM disk is especially useful and efficient when you run programs that periodically reload different subprograms into memory. This is a function of the application you are going to run, and the documentation for that software will recommend that you set up RAM disk if it is appropriate.
You set up your RAM disk using the MS-DOS, Utility Program RAMDISK. See MacCharlie MS-DOS for full details on use of this utility. If you copy the RAMDISK.DEV file to your boot disk, the utility program will determine the number of disk drives that are available to MacCharlie, and will name your RAM disk with the next drive letter. The usual name is drive C.
In the discussions that follow, your correct responses to the questions on the screen are shown in
boldface
lowercase letters, and are offset on a separate line in the text. Uppercase letters are used to show the names of commands, programs, and files. In actual use, MacCharlie will let you type in either lowercase or uppercase letters, or a combination of both.
Individual alpha and numeric keys are referred to by their alpha or numeric character. When we refer to special function keys, their keycap names will be enclosed by angle bracketsthe symbols "<" and >" as in < Return>.
Three important keys in the IBM PC world are <Enter>, <Alt>, and <Ctrl>. The corresponding keys on the Macintosh keyboard are <Return>, <Option>, and the Command key, respectively.
The Command key is immediately to the left of the space bar and is labelled with the symbol < ~g >. In this manual, it will be referred to as <Command>.
The two <Option> keys are located on the extreme ends of the bottom row of the Macintosh keyboard. They are each independently equivalent to the <Alt> key on the IBM PC keyboard. The meaning of the <Option> and <Command> keys will usually be apparent from the context of the discussion. Chapter 3 provides greater detail.
MacCharlie runs IBM PC software in the MacCharlie window, which you open after booting the MacCharlie disk in your Macintosh.
Inside this window, everything is in the IBM PC world, while everything outside the window is in the Macintosh world. Outside, you can use the mouse and all of the Apple menu utilities just as you do in normal Macintosh operations.
Inside the MacCharlie window, however, you must use standard IBM PC commands. You must load the Disk Operating System and your chosen IBM PC application software. This chapter tells you how to do it.
The MacCharlie application software disk is the 3 1/2 inch disk that came with your MacCharlie. It is a system disk; you do not need any other disk to get going.
If you have not yet made a copy of this disk, do so now, following the instructions for copying an entire disk found in Macintosh. Then you can
put the original away. If your working copy ever becomes unusable, you can make another copy from the original.
To boot (meaning start) the MacCharlie software, place the disk in the Macintosh internal disk drive. Press the power switch on the lower right corner of the front of MacCharlie to turn on both computers. The indicator light will light up to indicate that power is on. If your Macintosh was already on and using another system disk, you can replace it with your MacCharlie disk or use the external drive, if you have one.
You will hear the disk drive operating, and soon the MacCharlie disk icon will appear on the desktop. Doubleclick on the disk icon, which will open the MacCharlie disk window on the desktop. This is the best time to insert the MS-DOS diskette into MacCharlie's drive A, as discussed in the next section.
MS-DOS, stands for Microsoft Disk Operating System. Microsoft Corporation is the name of the company that wrote the DOS software. DOS is an acronym, commonly pronounced "doss." It is a collection of programs wich allow MacCharlie to find and manipulate files residing on applications diskettes. These programs process the commands that manage your IBM PC programs and data. They also help you manage the hardware components of your MacCharlie system, including the Macintosh components that MacCharlie uses.
The DOS programs are supplied to you on the MacCharlie MS-DOS diskette. This diskette is a 5 1/4 inch floppy diskette found in the plastic diskette envelope at the back of your MacCharlie MS-DOS manual.
It will be beneficial for you to study MacCharlie MS-DOS so that you understand the MS-DOS 3.1 Disk Operating System. The following sections tell you only how to start DOS and how to make a backup copy of the DOS diskette.
Each time you start MacCharlie afresh, you must load DOS from a diskette. This means that a copy of the essential DOS programs are read from that diskette and placed in MacCharlie's memory.
Initially you use the full DOS diskette supplied with MacCharlie. Later you can use any diskette onto which you have copied just those essential DOS programs, as described in the next section. The full DOS diskette contains many additional programs, but only a few of these are necessary for DOS startup.
From the previous section, you have the MacCharlie disk window open on the screen. In that window, you see the System Folder, Empty Folder, MacCharlie Resource File, and MacCharlie Application File icons. If you haven't yet done so, go ahead and insert your DOS diskette in MacCharlie's drive A. Now you can double click on the MacCharlie application icon to open its window.
That's all there is to loading DOS. When the MacCharlie window opens on your screen, MacCharlie will automatically load MS-DOS. You will see the red "in use" lamp on drive A light up to indicate that it is operating.
MacCharlie will automatically get the date and time from the Macintosh's clock and pass that information to DOS. You do not have to manually type in date and time in response to DOS queries on the screen, as you do on some DOS-based systems. Date and time are important to DOS. Each file you create during any DOS session carries a time and date "stamp" in the file directory, identifying precisely when it was created.
Let's look at how you start DOS, step-by-step.
1. Open the MacCharlie Disk window on the Macintosh as described above.
2. Insert the DOS diskette in drive A and close the lever.
3. Open the MacCharlie application icon in the window.
If you did not previously insert your DOS diskette in drive A, MacCharlie will be in the printer buffer mode. (See "MacCharlie As a Printer Buffer" section in this chapter.) You can insert the DOS diskette into drive A now and start DOS by pressing and holding the <Command> and <Option> keys while you press the <Del> key on the right keypad of the MacCharlie keyboard extension.
4. The disk drive "in use" lamp lights while DOS is being read.
5. After a brief pause, the screen displays
Compatability Software
Copyright (C) 1984,85 by Phoenix Software Associates, Ltd.Microsoft MS-DOS
Version 3.10 (C) Copyright Microsoft Corporation 1981, 1985
The A> is the DOS prompt which tells you that it is your turn to tell DOS what to do by entering a command. The "_" symbol is the cursor, where your next keystroke will be displayed.
The next thing you should do, if this is the first time you have booted your DOS diskette, is make a backup or working copy of it for daily use. Then, if your working copy of DOS is ever misplaced or damaged, you can simply make another working copy from the original.
Except in the normal use of the software or to make a backup copy of the software, the software may not be copied without the prior written consent of Dayna Communications. Refer to the copyright notice appearing on the inside front cover of this manual for more information.
To begin, you need your original DOS diskette and another one for the copy, preferably brand new. If the second diskette has been used before, make sure that it does not contain information you will need again.
This procedure will destroy any previous information stored on the diskette, if it has been used before. We'll call the second diskette the "backup." Read through the following discussion before you start.
There are two sets of instructions; use the first set if you have the basic version of MacCharlie with a single floppy disk drive. Use the second set if you have MacCharlie Plus, with two floppy disk drives. For MacCharlie Plus, skip to page 35.
COPY INSTRUCTIONS FOR MacCHARLIE
1. Make sure DOS is ready and A> is displayed. See the section entitled "Starting DOS" if you have questions.
2. Insert your DOS diskette into the drive, if it is not already there. Close the lever.
3. Type
diskcopy
and press the <Return> key. The screen will display
Insert SOURCE diskette in drive A:
Press any key when ready . . .
4. Your source diskette, which is your DOS diskette, is already in drive A. Press any key. The screen will display
Copying 40 tracks
9 Sectors/Track, 2 sides
Insert TARGET diskette in drive A:
Press any key when ready...
5. Remove the DOS diskette, insert the backup (target) diskette, and press any key to tell DOS the correct diskette has been inserted.
6. In a short time, the screen will display
Formatting While Copying
Insert SOURCE diskette in drive A:
Press any key when ready...
The formatting message appears only when the backup diskette has never been used.
7. Remove the backup diskette, insert the DOS diskette, and press any key.
8. Keep repeating steps 4 through 7 until the screen displays
Copy another diskette (Y/N)?
9. Type
n
You don't have to press the <Return> key.
Your diskette is now copied. The following steps compare the target diskette to the source diskette, to make sure that the target diskette is an exact copy.
10. Type
diskcomp
and press the <Return> key. The screen will display
Insert FIRST diskette in drive A:
Strike any key when ready...
11. Insert your original DOS diskette in drive A and press any key. Now the screen will display
Comparing 40 tracks
9 Sectors/Track, 2 Sides
Insert SECOND diskette in drive A:
Strike any key when ready...
12. Remove the DOS diskette, insert the backup diskette, and press any key. The screen will display
Insert FIRST diskette in drive A:
Strike any key when ready...
.
13. Remove the backup diskette, insert the DOS diskette, and press any key.
14. Keep repeating Steps 12 and 13 until the screen displays
Diskettes compare ok
Compare another diskette (Y/N)?
15. Type
n
The DOS prompt, A>, appears. Remove the diskette from the drive. With a felt-tip pen, label and date your "DOS DISKETTE BACKUP."
Store the original DOS diskette and use the backup in your daily operations. From now on, this backup diskette will simply be referred to as the DOS diskette, because it is an exact copy of the original DOS diskette.
COPY INSTRUCTIONS FOR MacCHARLIE PLUS
1. Make sure DOS is ready and A> is displayed. See the section entitled "Starting DOS" if you have questions.
2. Insert your DOS diskette into drive A if it is not already there. Close the lever. Insert the backup diskette into drive B and close the lever.
3. Type
diskcopy a: b:
and press the <Return> key. The screen will display
Insert SOURCE diskette in drive A:
Insert TARGET diskette in drive B:
Press any key when ready...
4. Since your diskettes have already been inserted into these drives, you can press any key to tell DOS the diskettes are ready. The screen will display
Copying 40 tracks
9 Sectors/Track, 2 Sides
Formatting While Copying
The formatting message appears only when the backup diskette has never been used.
5. DOS is being copied from the diskette in drive A to the diskette in drive B. You see the "in use'' lights go on and then off as each drive is used. When the copy has been made, the screen will display
Copy another diskette (Y/N)?
6. Type
n
You don't have to press the <Return> key. The DOS prompt, A>, is displayed. Your diskette is now copied. The following steps compare the target diskette to the source diskette, to make sure that the target diskette is an exact copy.
7. Type
diskcomp a: b:
and press the <Return> key. The screen will display
Insert FIRST diskette in drive A:
Insert SECOND diskette in drive B:
Strike any key when ready
8. Press any key. Now the screen will display
Comparing 40 tracks
9 Sectors/Track, 2 Sides
9. Again you will see the "in use" lights go on and off as the disk drives operate. When the comparison is complete, the screen will display
Diskettes compare ok
Compare another diskette (Y/N)?
10. Type
n
The DOS prompt, A>, appears. Remove both diskettes from their drives. With a felttip pen, label and date your "DOS DISKETTE BACKUP."
Store the original DOS diskette and use the backup in your daily operations. From now on, this backup diskette will simply be referred to as the DOS diskette, because it is an exact copy of the original DOS diskette.
If you want to start your IBM PC application software immediately upon booting MacCharlie, you need to copy your application diskette onto a diskette containing a copy of the DOS startup programs, as discussed below.
Most applications do not require this procedure, but if the DOS startup programs are not on the application disk, you will have to first boot the DOS diskette, then remove the DOS diskette and insert the application diskette. Finally, when you type in the name of the application program, it will begin running.
If you intend to transfer files created by your application software to Macintosh, or if you will need to transfer Macintosh files into MacCharlie for use by the application, you will also need to copy the TRANSFER.COM utility program from your DOS diskette onto the application diskette.
Before you load any application software for the first time, you should make a working copy of the original diskette, with a copy of DOS also on it. You need to format a blank diskette, copy the DOS startup programs and your application software onto it. Also copy TRANSFER.COM onto the application diskette, so that you can transfer files. See your MacCharlie MS-DOS manual for details. Refer to the detailed information and instructions on the FORMAT, SYS, TRANSFER, DISKCOPY, and COPY commands.
When you want to run your application on MacCharlie, instead of clicking on the MacCharlie application icon with the DOS diskette in drive A, you can do it with the application diskette with DOS on it in the drive.
Some applications start automatically as soon as DOS has finished loading. Others have their own startup procedures, which require you to type in a command. Check the manual for your application software to see what additional commands, if any, are necessary to start the application program.
When you are finished working on a document, you must decide whether to keep it or throw it away. Some applications will save your work automatically, or give you the option of specifying a SAVE command. If the file has a temporary name, or if you want to assign a name other than that given automatically, you can rename it or copy it to a new file with a different name. The commands to do these functions are described in MacCharlie MS-DOS.
From time to time you will probably leave an application running on MacCharlie in order to work on your Macintosh before continuing with the IBM PC application. You might, for example, want to copy something from the MacCharlie application over to a Macintosh document. Or you might want to put a few notes from earlier Macintosh work into the Note Pad or Scrapbook to copy into some MacCharlie document when you return to the MacCharlie window.
In order to access any Macintosh files or commands beyond the Apple menu or desktop utilities, you will have to close the MacCharlie window. When you do, MacCharlie asks you if you want to terminate the IBM PC application. Before you say "yes," be sure you have saved everything you value. Terminating is just like turning MacCharlie (but not Macintosh) off and then on again. Open data files can be lost or damaged. You can, however, simply say "no," and the application stays alive, though dormant, in MacCharlie's memory until you return and reopen the MacCharlie window.
Within the MacCharlie window, you can edit your document using any editing feature that is part of your application software program. This is done in the same manner as it would be if you were running the software on an IBM PC using the same commands and corresponding keystrokes. The documentation accompanying your application software will detail each feature and give you instructions.
MacCharlie adds a number of other features which give it tremendous flexibility and computing capability that are not available in either the Macintosh or the IBM PC by themselves. These features are discussed in the following sections.
These typical editing actions remain available, as in Macintosh, in the desktop utilities' windows, which you can still open while you are working within the MacCharlie window. This means that you can "Cut" a section of text out of any of the desktop utilities' windows, for moving to the Clipboard and later pasting into the MacCharlie window or elsewhere.
Inside the MacCharlie window itself, however, you use the Edit menu option "Copy." This is because the Macintosh can't affect what is in MacCharlie's memory. It can only see and operate on the MacCharlie document, i.e., the information on or scrolled above the screen. Therefore, it can only make a copy of what is in the MacCharlie document, for moving to the Clipboard. When this occurs, the same information remains intact in MacCharlie's memory.
These features are selectable from the Edit menu. First, you make a text selection by dragging the mouse from the beginning to the end of the text you want. Then you select "Cut" (if you are in one of the desktop utility windows) or "Copy'' from the Edit menu. You cannot select the wrong option. Only those menu options available to you in a particular situation can be selected. Those which cannot be selected are displayed on the menu in a subdued tone. When you select "Cut" or "Copy,'' the text you have selected is placed onto the Clipboard. If you cut from the desktop utilities, the selected text is also deleted from the original location in the desktop utility.
You can now place that text intc, new positions within any Macintosh or MacCharlie documents. You simply click the mouse at the desired insertion point and then select "Paste" from the Edit menu.
You can paste cut or copied text repeatedly until you change the contents of the Clipboard with another "Cut" or "Copy."
MacCharlie enables you to copy and paste text selected from a document produced by an IBM PC application. You can put your copied selection into any other Macintosh or MacCharlie document, regardless of where that copy originated.
MacCharlie simply copies the Clipboard contents into the target document exactly as if you had typed it there yourself.
You can see the contents of the clipboard at any time by selecting the Show Clipboard option on the Edit menu. Then you can leave it on the desktop like any other window, or put it away. Clicking the close box on the clipboard window or selecting the "Hide Clipboard" option from the Edit menu will remove the clipboard window from the screen.
To take text from a document in the MacCharlie window over to a Macintosh document you must first close the MacCharlie window. You do so by selecting the "Close" option from the Edit menu or by clicking on the MacCharlie window's close box.
When you close that window, you are given the option of terminating the IBM PC application it contains. If you intend to terminate, you should first save whatever work or files you have changed, if you will need them later.
You can, however, leave the MacCharlie application running while you go to work in the Macintosh environment, subject to two cautions: the application shouldn't write to the screen because without the active MacCharlie window that output will be lost; and it cannot expect input from the operator because, after MacCharlie's window has been closed, all of the keystrokes will be sent to the Macintosh.
After you close the MacCharlie window and bring up the Macintosh document you want, simply click on the spot where you want the text inserted, and select the "Paste" option to paste it in place.
When you're done working in the Macintosh environment, you can return to MacCharlie simply by reopening its window. If you left an application running, it will reappear on the screen just as you left it.
One consequence of terminating the IBM PC application is that MacCharlie's entire memory becomes available for use as a printer buffer for Macintosh. This means you can be printing documents and continue working on your Macintosh at the same time. See "MacCharlie As a Printer Buffer" later in this chapter.
One of MacCharlie's unique features is the file transfer capability. Files can be transferred from Macintosh to MacCharlie and vice versa. All transfers of complete files are handled from the MacCharlie window. (This excludes text transfers using the Clipboard, Note Pad, or Scrapbook, which can begin or end in either world, as discussed above.)
There are, however, a few cautions and restrictions. Before you attempt any file transfers, you should read this entire section to make sure that your intended transfer can be done, and that the file will be usable after you have finished.
Flie transfers to MacCharlie consist of copying a Macintosh document from the Macintosh world into a MacCharlie file, thereby bringing it into the IBM PC world.
To start this process, you must be at the DOS level, with the A~ prompt on the screen. You must insert a diskette with TRANSFER.COM on it into one of MacCharlie's disk drives. Now you are ready to pull down the MacCharlie File menu and select the "Transfer File to MacCharlie" option. A new window opens up, showing you the list of files on the currently active disk. You can use the mouse to select one of these, to switch drives to see the directory of a different disk, or to eject either disk in order to insert another and display its contents.

Once your selection is made, clicking on "Open" brings up one more window, to verify or rewrite the target file name. Since Macintosh file names can be longer than those created under MSDOS, MacCharlie takes the first eleven nonblank characters and formats them as a PC name. For example, the Macintosh file named MACCHARLIE IS YOUR BRIDGE will be presented for your approval or revision as MACCHARL.IEI.
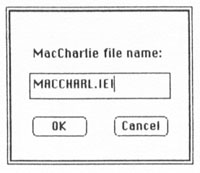
If this created name is acceptable, you simply click on OK to cause a direct file-to-file transfer from the Macintosh disk to the MacCharlie diskette.
To change the name, start typing the one you want. MacCharlie's created name disappears and yours takes its place. MacCharlie file names cannot exceed eight characters before the period and three after it. The period is only necessary if you want to add up to three more characters. You can use any character you can see on the screen except those following:
= + * 1 ?"< > [ ] ; :
If one of these appears in your filename; DOS will consider the name ended at the character to its left. The first period will define the beginning of the threecharacter extension; extra characters and periods are ignored.
There are also a few reserved names in DOS. Don't use any of the following:
CON AUX COM1 COM2 LPT1 LPT2 PRN NUL
If you do, the results are unpredictable; almost certainly, they will not be what you want.
Once the name is acceptable to you (and DOS), clicking on OK will cause a direct file-to-file transfer from the Macintosh disk to the MacCharlie diskette.
This option takes a file from a MacCharlie diskette and creates a copy of it on a Macintosh disk. This effectively translates the file from the IBM PC world into the Macintosh world.
Again you handle the transfer from the MacCharlie window. You must be at the DOS level, with the A~ prompt on the screen. Insert a diskette with TRANSFER.COM on it into one of MacCharlie's disk drives. If you are not
sure of the filename of the file you want to transfer, you must type
dir d:
(where d: represents any drive name, other than the default drive, which does not need to be included as part of the command) at the DOS prompt before starting the transfer process. This will print the directory of the diskette in the drive you have named. You can change diskettes at any time and look at the new diskette's directory, if necessary. Once you are sure of the filename, you are ready to pull down the File menu and select the "Transfer File to Macintosh" option. This window appears:
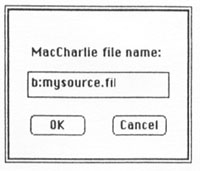
You simply type the name of the file you want transferred, starting with the drive letter if it is on a drive other than the default drive currently in use. For example, if you're using drive A on MacCharlie Plus and the file you want is on drive B, you would type
b:mysource.fil
but if the file you want is in drive A, you would type
mysource.fil
If you change your mind, you can click on the Cancel button to return to MacCharlie operations.
When you are satisfied that you have the right filename, including the drive name and the extension (after the dot), click on OK. The following window appears:
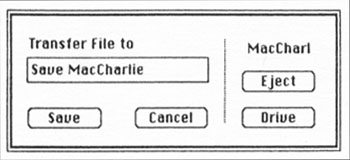
When you are ready, click on the Save button in the window to start the filetofile transfer.
Straight ASCII text files can be transferred either to or from MacCharlie without any problems. ASCII uses a standard 7bit code for every printable character. These codes also exist for every special character, i.e., the characters you create by holding down the <Command> or <Option> keys while you press another character. (On the IBM PC, the <Ctrl> or <Alt> keys create these special characters.) Printable text poses no difficulties, but control codes usually need to be translated into text, because the receiving computer sometimes interprets them as commands. The results are often undesirable.
Consequently, if your file has, for example, the combination of the Control and the letter u codes to define underlining, then the received file will have the seven bits that represent the <Ctrlu> keystroke combination in its place. You will have to convert them to the characters that create your intended effect in the new file, or you can delete them.
Characters that are not part of the standard ASCII character set may be unusable after transfer.
Microsoft WORD files, forexample, use nonstandardcharacters. They may be transferrable, but there can be no guarantee that Microsoft WORD for the Macintosh creates or can use data files formatted as Microsoft WORD data files for the IBM PC version.
Since any text file can be transferred between Macintosh and MacCharlie, source program files can too. However, they will only be usable on the system on which they originated. You would not be able to run an IBM PC program on the Macintosh, nor a Macintosh program on the IBM PC, unless the interpreter or compiler for that program's language were identical in both worlds.
Under no circumstances can executable programs of any kind be transferred.
Future releases of the MacCharlie application software will make it possible for MacCharlie to access Macintosh drives for direct input and output as if they were MacCharlie drives. This expansion of file storage and access would not be available in the other direction, i.e., the Macintosh would not access MacCharlie's drives.
MacCharlie enables you to print IBM PC output via your Imagewriter or a separate serial printer attached to the MacCharlie RS232 port.
The MacCharlie names for the Imagewriter are LPTI and PRN. For serial output to an attached printer or modem, the name is COM1.
Printing from Macintosh is unchanged. You select "Print" from one of the menus and your selection or document goes to the Imagewriter.
From MacCharlie, the Imagewriter is accessed as LPT1, which means Line Printer 1, a parallel printer port in the language of the IBM PC world. Output that normally would go to LPT1 will go to the Imagewriter. For example, you can print an exact image of your MacCharlie window on the Imagewriter. You hold down the <Shift> key and keep it down while you press the <Prt Sc> key on the righthand keypad, upper left corner. Every line of the MacCharlie window as you see it on the screen, top to bottom, will be printed.
Any IBM PC application expecting to use LPT1 will print on the Imagewriter.
You can attach other devices to the RS232 port (connector) at the rear of MacCharlie's cabinet. Serial printers, modems, plotters, and other devices can be addressed as COM1. A typical command to print a file on such a printer would be COPY MYFILE COM1:. To send or receive communications or files over telephone wires, you would simply attach a modem to that port and use an IBM PC terminal emulator program to handle the communication. This port can also be used for wired connections to another computer.
Your Macintosh is capable of transmitting documents to the Imagewriter printer much faster than the printer can absorb the data and print it out on paper. Consequently, the computer must sit and wait for the printer, and when the printer is ready for more, the Macintosh can send more. A printer buffer is a device that can receive the output from a computer, such as the Macintosh, at a very fast rate, and store it in its own memory. The printer can then absorb the output from the buffer at its own rate. This frees up the Macintosh for other work while the printer is taking time to print the document.
When there is no application running on MacCharlie, the entire MacCharlie RAM is availahle for use as a printer buffer between your Macintosh and the Imagewriter. Whenever you print a document from your Macintosh, it goes first into MacCharlie's RAM, where it is temporarily stored. From there it is fed to the printer as fast as the printer can accept it.
This means you can select and print one Macintosh document, and then immediately select and print another Macintosh document, again and again to the limit of your MacCharlie RAM. With a MacCharlie Plus, you could store up to 320 pages, each containing 40 lines of 50 characters, for printingwithout tying up your Macintosh. You would simply go on with your other work while the Imagewriter printed the pages at its own pace (preferably in another room).
However, if you leave an application running on MacCharlie, the RAM is in use. No printer buffer is available. The choice is yours; different choices may be appropriate in each situation.
When you pull down the Keyboard menu, you can choose to display the entire MacCharlie keyboardfunctions, alphanumerics, and the numeric keypador only the Macintosh keyboard plus the numeric keypad.
Once one of these keyboards is displayed, it stays until you make it go away, by clicking on its close box or selecting the "Hide Keyboard" option from the Keyboard menu. When you hide it, it goes under the MacCharlie window on the desktop. You have two ways to get it back: select the "Show Keyboard'' option of that menu; or size the MacCharlie window until you can click on it with the mouse to pull it to the top.